Question Types
Fynzo Survey provides a variety of question types for you to choose from based on your research needs. Let's delve into these options in detail to select the most appropriate question formats.
Welcome Page
Add Welcome Page to your survey following these easy steps:
Go to Welcome Page
If you want to add Welcome Page to your survey, you can add by clicking on the dropdown icon and then clicking on 'Welcome Page'.
Enter Welcome Text
You can add the Welcome Text in the field shown. You can preview the same in the right hand panel 'Welcome Page Review' as shown in the picture.
Enter Welcome Image
You can enter the Welcome Image through the field shown. You can preview the same in the right hand panel 'Welcome Page Review' as shown in the picture.
Enter Button Text
You can enter the Button Text through the field shown. You can preview the same in the right hand panel 'Welcome Page Review' as shown in the picture. Click 'Submit' after you done.
Final Look
This is how your welcome page will look to the respondents while filling the survey.
Multiple Choice
Follow these steps to select the 'Multiple Choice' Question Type in your survey:
Click Multiple Choice
To select Multiple Choice Question type, select 'Multiple Choice' from the dropdown list.
Enter Question Text
Now enter your question in the filed as shown. You can also preview the same in the right hand panel under 'Add Question Preview'.
Choice for Mandatory Question
If you want to make the question mandatory or required, you can toggle on the icon as shown in the picture below. Toggle off if you don't want to make the question mandatory to fill.
Add Choices
Now provide the values for the answer options, where respondents can select the best choice. You can add as many choice you want by clicking '+ Add a Choice' button. You can also preview your options in the 'Add Question Preview' on the right.
Give Choice Score
If you want to give scores to the choices, you need to Toggle on the icon as shown and then give the scores to the choices. If you don't want to give any scores to the values then keep this toggled off.
Bulk Choices
To add the choices at once, just click the '+ Add' button and list the choices you want for your question.
Add your choices in bulk here. Each choice must be entered on a separate line. Click on 'Add' after you add all the choices.
Choice "Other''
To provide the option 'Other' in the choices, toggle on the icon as shown, and then add 'Other Text' to allow respondents to input values not mentioned in the provided choices. You can preview the same on the right hand 'Add Question Preview' panel.
Click Submit
Your question is now complete. Simply click 'Submit' to add it to your survey.
Final Look
This is how your question will finally look to the respondents while filling the survey.
Short Text
If you want your question to be answer in a short text, then follow these steps:
Click Short Text
To use Short Text Question type, select 'Short Text' from the dropdown list.
Enter Question Text
Now enter your question in the filed as shown.
Choice For Mandatory Question
If you want to make the question mandatory or required, you can toggle on the icon as shown in the picture below. Toggle off if you don't want to make the question mandatory to fill.
Maximum Characters
You can also set the maximum number of characters you want the answers to be in.
Click 'Submit'
After filling all the details of the question, simple click on 'Submit'. You can preview your question in the right hand side panel side by side.
Final Look
This is how your question will finally look to the respondents while filling the survey.
Long Text
If you want your question to be answer in Long Text, then follow these steps:
Click Long Text
To use Short Text Question type, select 'Long Text' from the dropdown list.
Enter Question Text
Now enter your Question in the filed as shown. You can also preview the same under 'Add Question Preview'.
Choice For Mandatory Question
If you want to make the question mandatory or required, you can Toggle on the icon as shown in the picture below. Toggle off if you don't want to make the question mandatory to fill.
Maximum Characters
You can also set the maximum number of characters you want the answers to be in.
Click 'Submit'
After filling all the details of the question, simple click on 'Submit'. You can preview your question in the right hand side panel side by side.
Final Look
This is how your welcome page will look like to the respondent while filling the survey.
Number
If you want your question to be answer in Number, then follow these steps:
Click Number
To use Number Question type, select 'Number' from the dropdown list.
Enter Question Text
Now enter your Question in the filed as shown. You can also preview the same under 'Add Question Preview'.
Choice For Mandatory Question
If you want to make the question mandatory or required, you can Toggle on the icon as shown in the picture below. Toggle off if you don't want to make the question mandatory to fill.
Maximum Digits
You can also set the maximum number of digits you want the answers to be in.
Click 'Submit'
After filling all the details of the question, simple click on 'Submit'. You can preview your question in the right hand side panel side by side.
Final Look
This is how your welcome page will look like to the respondent while filling the survey.
Statement
If you want your question to be answer in a Statement, then follow these steps:
Click Statement
To use Statement Question type, select 'Statement' from the dropdown list.
Enter Question Text
Now enter your Question in the filed as shown. You can also preview the same under 'Add Question Preview'. Click 'Submit' once you done.
Final Look
This is how your welcome page will look like to the respondent while filling the survey.
Picture Choice
If you want your question to be in 'Picture Choice' format, then follow these steps:
Click Picture Choice
To use Picture Choice Question type, select 'Picture Choice' from the dropdown list.
Enter Question Text
Now enter your Question in the filed as shown. You can also preview the same under 'Add Question Preview'.
Choice For Mandatory Question
If you want to make the question mandatory or required, you can Toggle on the icon as shown in the picture below. Toggle off if you don't want to make the question mandatory to fill.
Enter Choices
Now add the 'Picture Choices' with pictures and their respective texts in the fields shown below and you can preview the same in the right hand side panel.
You can also as many choice you want by clicking '+ Add a choice' Button.
Multiple Answer
If you want the respondent to select multiple choices, you need to Toggle on the icon as shown. If you don't want the question to be multiple choice answer type, then keep the icon Toggled off.
Click 'Submit' once all the changes are done.
Checkbox
Under checkbox, a respondent can select multiple choices from the given checklist. Follow these steps to select the 'Checkbox' Question Type in your survey:
Click Checkbox
To select Checkbox Question type, select 'Checkbox' from the dropdown list.
Enter Question Text
Add the Question text in the field as shown. You can preview the same as well in the right hand side panel under 'Add Question Preview'.
Choice for Mandatory Question
If you want to make the question mandatory or required, you can toggle on the icon as shown in the picture below. Toggle off if you don't want to make the question mandatory to fill.
Add Choices
Now provide the values for the answer options, where respondents can select the best choice. You can add as many choice you want by clicking '+ Add a Choice' button. You can also preview your options in the 'Add Question Preview' on the right.
Give Choice Score
If you want to give scores to the choices, you need to Toggle on the icon as shown and then give the scores to the choices. If you don't want to give any scores to the values then keep this Toggled off.
Bulk Choices
To add the choices at once, just click the '+ Add' button and list the choices you want for your question.
Add your choices in bulk here. Each choice must be entered on a separate line. Click on 'Add' after you add all the choices.
Fix Selection Limit
You can also adjust the selection limit for the checklist, determining how many options a respondent can choose. Simply click the dropdown icon as shown and select the most suitable option.
Unlimited
Selecting 'Unlimited' will make the respondents choose as many options they want without any selection limit.
Selecting 'Unlimited' will make the respondents choose as many options they want without any selection limit.
Exact Number
Selecting 'Exact Number' will make the respondents choose the specific number of options that you will fix.
Selecting 'Exact Number' will make the respondents choose the specific number of options that you will fix.
Range
Selecting 'Range' will make the respondents choose number of options between the range of numbers you will fix.
Selecting 'Range' will make the respondents choose number of options between the range of numbers you will fix.
Choice "Other''
To provide the option 'Other' in the choices, Toggle on the icon as shown, and then add 'Other Text' to allow respondents to input values not mentioned in the provided choices. You can preview the same on the right hand 'Add Question Preview' panel.
Click Submit
Your question is now complete. Simply click 'Submit' to add it to your survey.
Dropdown
If you want your question type to be 'Dropdown', then follow these steps:
Click Dropdown
To use Dropdown Question type, select 'Dropdown' from the dropdown list.
Enter Question Text
Now enter your Question in the filed as shown. You can also preview the same under 'Add Question Preview'.
Choice For Mandatory Question
If you want to make the question mandatory or required, you can Toggle on the icon as shown in the picture below. Toggle off if you don't want to make the question mandatory to fill.
Add Choices
Now provide the values for the answer options, where respondents can select the best choice. You can add as many choice you want by clicking '+ Add a Choice' button. You can also preview your options in the 'Add Question Preview' on the right.
Give Choice Score
If you want to give scores to the choices, you need to Toggle on the icon as shown and then give the scores to the choices. If you don't want to give any scores to the values then keep this Toggled off.
Bulk Choices
To add the choices at once, just click the '+ Add' button and list the choices you want for your question.
Add your choices in bulk here. Each choice must be entered on a separate line. Click on 'Add' after you add all the choices.
Choice "Other''
To provide the option 'Other' in the choices, Toggle on the icon as shown, and then add 'Other Text' to allow respondents to input values not mentioned in the provided choices. You can preview the same on the right hand 'Add Question Preview' panel.
Click Submit
Your question is now complete. Simply click 'Submit' to add it to your survey.
Star Rating
If you want your question type to be 'Star Rating', then follow these steps:
Click Star Rating
To use Star Rating Question type, select 'Star Rating' from the dropdown list.
Enter Question Text
Now enter your Question in the filed as shown. You can also preview the same under 'Add Question Preview'.
Choice For Mandatory Question
If you want to make the question mandatory or required, you can Toggle on the icon as shown in the picture below. Toggle off if you don't want to make the question mandatory to fill.
Rating Scale
Adjust the Rating Scale to your preference by selecting the scale value from the list using the dropdown icon as shown.
Select Shape
You can select any shape from the list by clicking the dropdown icon as shown.
Labels
Give labels to your rating scales by adding the values in the fields as shown. You can preview the same in the right hand side panel under 'Add Question Preview'.
Click 'Submit' once you are done with all the changes.
Magic Fills
Activate 'Magic Fills' feature with pro subscription which will enable you to instantly fill all labels, simplifying your survey creation process. Click 'Magic Fills' as shown to use this amazing feature.
Select Labels
Now select the labels you want for your NPS scale from the dropdown as shown.
Reverse Label Inputs
You can also reverse the label on the NPS scale by 'Toggle On' the icon as shown. If you don't want to reverse the label input keep the icon Toggled Off. Click 'Save' once you are done.
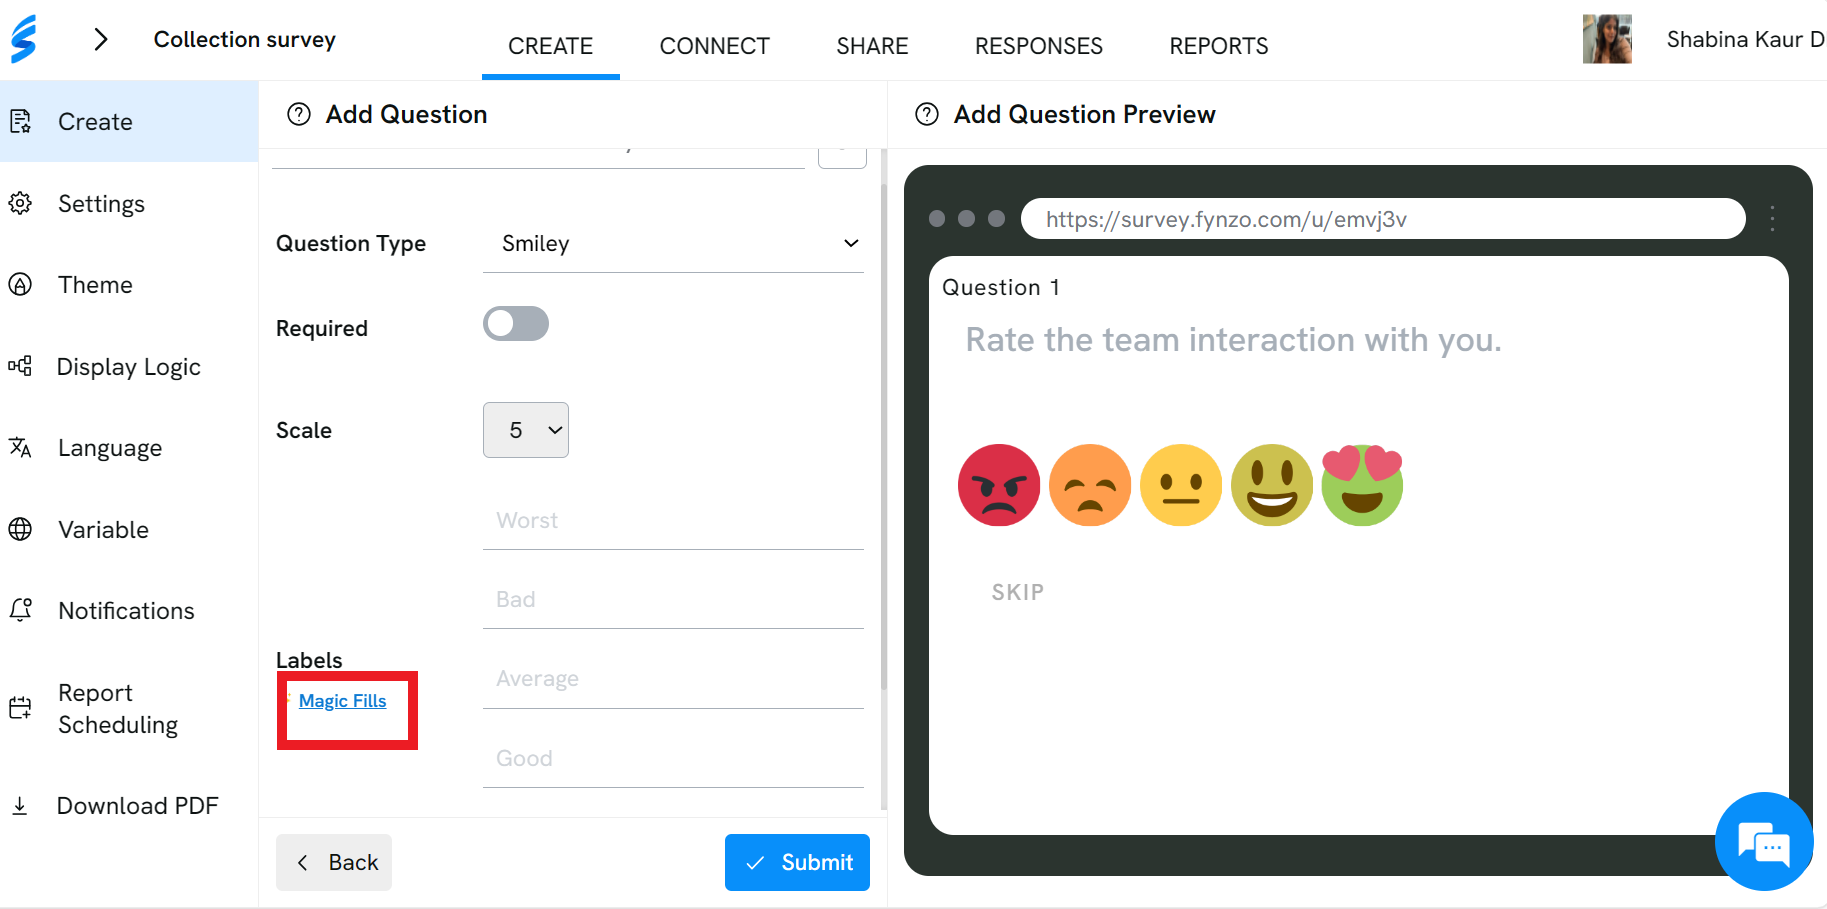
Smiley
If you want your question type to be 'Smiley', then follow these steps:
Click Smiley
To use Smiley Question type, select 'Smiley' from the dropdown list.
Enter Question Text
Now enter your Question in the filed as shown. You can also preview the same under 'Add Question Preview'.
Choice For Mandatory Question
If you want to make the question mandatory or required, you can Toggle on the icon as shown in the picture below. Toggle off if you don't want to make the question mandatory to fill.
Rating Scale
Adjust the Rating Scale to your preference by selecting the scale value from the list using the dropdown icon as shown.
Labels
Give labels to your rating scales by adding the values in the fields as shown. You can preview the same in the right hand side panel under 'Add Question Preview'.
Click 'Submit' once you are done with all the changes.
Magic Fills
Activate 'Magic Fills' feature with pro subscription which will enable you to instantly fill all labels, simplifying your survey creation process. Click 'Magic Fills' as shown to use this amazing feature.
Select Labels
Now select the labels you want for your NPS scale from the dropdown as shown.
Reverse Label Inputs
You can also reverse the label on the NPS scale by 'Toggle On' the icon as shown. If you don't want to reverse the label input keep the icon Toggled Off. Click 'Save' once you are done.
Ranking
Follow these steps to select the 'Ranking' Question Type in your survey:
Click Ranking
To select Ranking Question type, select 'Ranking' from the dropdown list.
Enter Question Text
Now enter your Question in the filed as shown. You can also preview the same under 'Add Question Preview'.
Choice for Mandatory Question
If you want to make the question mandatory or required, you can Toggle on the icon as shown in the picture below. Toggle off if you don't want to make the question mandatory to fill.
Add Choices
Add the values or choices in the fields shown - from where the respondent will give the ranking. You can add as many choices as you want by clicking '+ Add a choice' button.
You can preview the choices on the right hand side preview panel.
Click Submit
Click 'Submit' once you are done with all the changes.
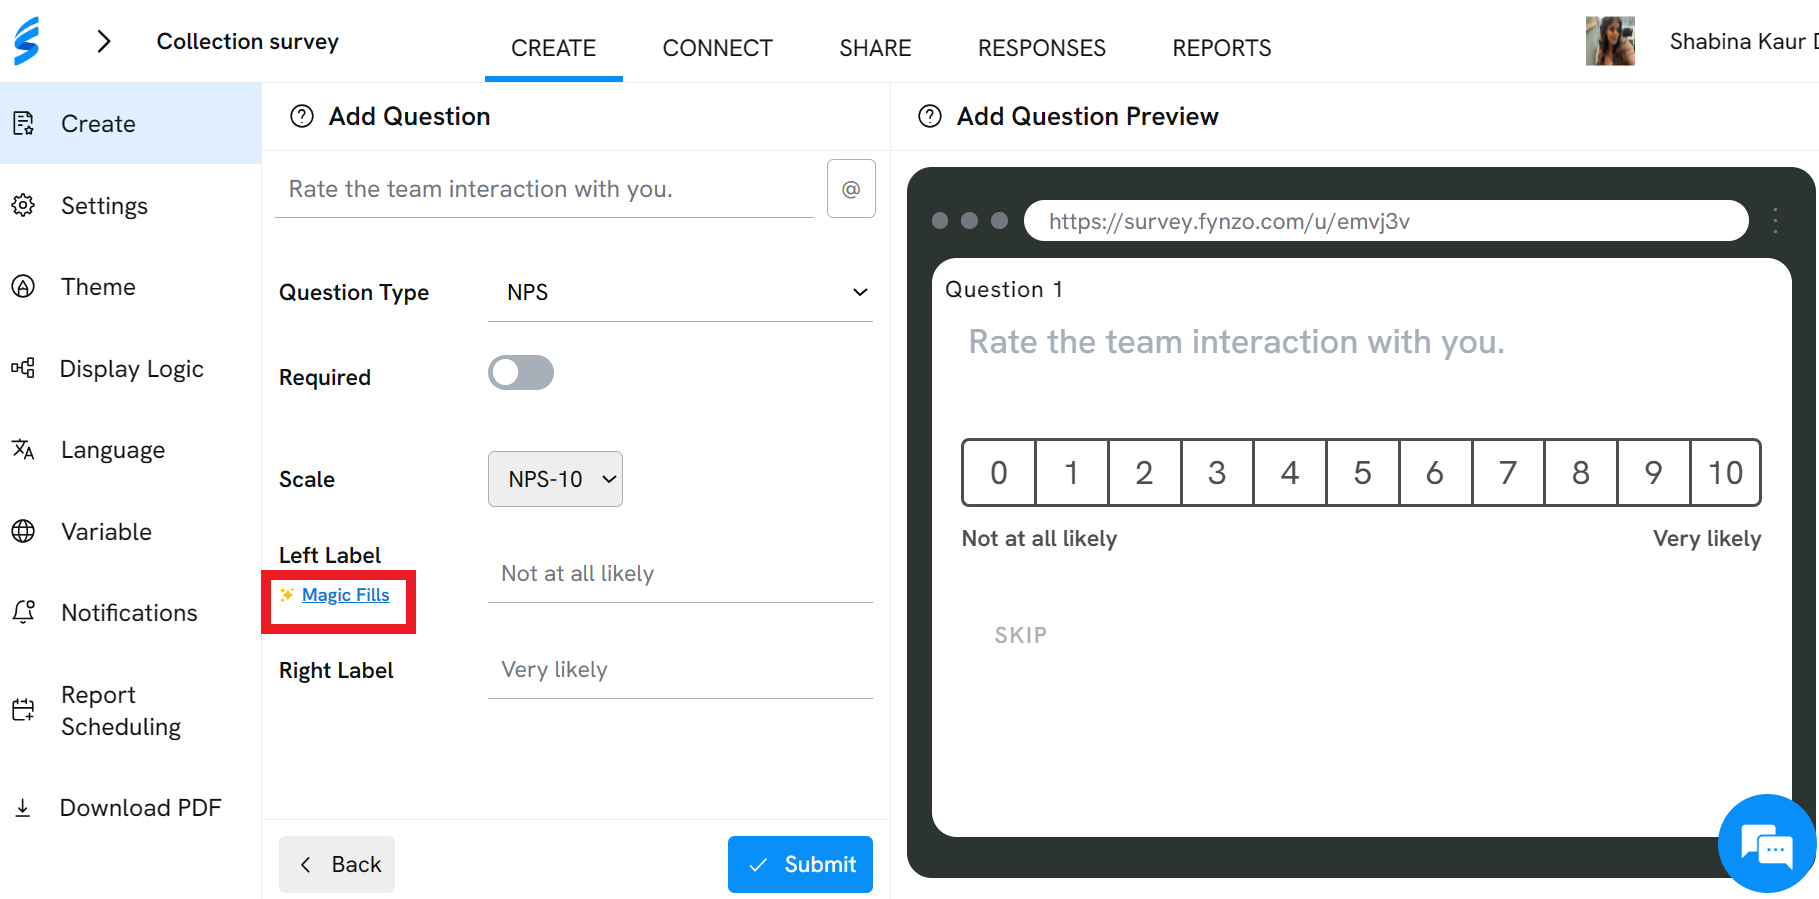
NPS
Follow these steps to select the 'NPS' Question Type in your survey:
Click NPS
To select NPS Question type, select 'NPS' from the dropdown list.
Enter Question Text
Now enter your Question in the filed as shown. You can also preview the same under 'Add Question Preview'.
Choice for Mandatory Question
If you want to make the question mandatory or required, you can Toggle on the icon as shown in the picture below. Toggle off if you don't want to make the question mandatory to fill.
NPS Scale
Adjust the NPS Scale to your preference by selecting the scale value from the list using the dropdown icon as shown.
Labels
Give labels to the NPS Scale by adding the values in the fields- Left Label & Right Label as shown. You can preview the same in the right hand side panel under 'Add Question Preview'.
Click 'Submit' once you are done with all the changes.
Magic Fills
Activate 'Magic Fills' feature with pro subscription which will enable you to instantly fill all labels, simplifying your survey creation process. Click 'Magic Fills' as shown to use this amazing feature.
Select Labels
Now select the labels you want for your NPS scale from the dropdown as shown.
Reverse Label Inputs
You can also reverse the label on the NPS scale by 'Toggle On' the icon as shown. If you don't want to reverse the label input keep the icon Toggled Off. Click 'Save' once you are done.
File Upload
Follow these steps to select the 'File Upload' Question Type in your survey:
Click File Upload
To select File Upload Question type, select 'File Upload' from the dropdown list.
Enter Question Text
Now enter your Question in the filed as shown. You can also preview the same under 'Add Question Preview'.
Choice for Mandatory Question
If you want to make the question mandatory or required, you can Toggle on the icon as shown in the picture below. Toggle off if you don't want to make the question mandatory to fill.
Select File Type
Choose the suitable File Type from the options provided in the dropdown list as shown, for the respondent to submit. Click Submit once you are done with all the changes.
Date & Time
Follow these steps to select the 'Date & Time' Question Type in your survey:
Click Date & Time
To select Date & Time Question type, select 'Date & Time' from the dropdown list.
Enter Question Text
Now enter your Question in the filed as shown. You can also preview the same under 'Add Question Preview'.
Choice for Mandatory Question
If you want to make the question mandatory or required, you can Toggle on the icon as shown in the picture below. Toggle off if you don't want to make the question mandatory to fill.
Allow Date & Time
Allow the options that you want the respondent to fill. You can select either one of them or both. Click 'Submit' once you are done.
Contact Information
Follow these steps to select the 'Contact Information' Question Type in your survey:
Click Contact Information
To select Contact Information Question type, select 'Contact Information' from the dropdown list.
Enter Question Text
Now enter your Question in the filed as shown. You can also preview the same under 'Add Question Preview'.
Choice for Mandatory Question
If you want to make the question mandatory or required, you can Toggle on the icon as shown in the picture below. Toggle off if you don't want to make the question mandatory to fill.
Adjust the fields & Submit
- Under "Show" Field-Toggle the icons for the contact details you wish to display.
- Under "Required" Field-Toggle the icons to make certain fields mandatory for respondents to fill.
- Under "Texts" Field-You can modify the text under Text fields.
- Under "Thank-You Notification" Field-You can toggle the icons to display Thank You notification for the specific contact details.
Click 'Submit' when you've completed all the changes.
Matrix
Follow these steps to select the 'Matrix' Question Type in your survey:
Click Matrix
To select Matrix Question type, select 'Matrix' from the dropdown list.
Enter Question Text
Now enter your Question in the filed as shown. You can also preview the same under 'Add Question Preview'.
Choice for Mandatory Question
If you want to make the question mandatory or required, you can Toggle on the icon as shown in the picture below. Toggle off if you don't want to make the question mandatory to fill.
Select Matrix Question Type
Select the most suitable option from the list as per your requirement. Here is the explanation of each option:
Single Select
Select the 'Single Select' option from the dropdown. Choosing this will make the respondent choose only one option from the list.
Multiple Select
Select the 'Multiple Select' option from the dropdown. Choosing this will make the respondent choose only one option from the list.
Text Input
Select the 'Text Input' option from the dropdown. Choosing this will make the respondent write text inputs.
Row Labels
Add row labels in the field shown in the picture. You can preview the same in the 'Add Question Preview'. You can add as many rows as you want by clicking '+ Add a row' button.
Column Labels
Add column labels in the field shown in the picture. You can preview the same in the 'Add Question Preview'. You can add as many rows as you want by clicking '+ Add a column' button. Click 'Submit' once you are done with all the changes.
Matrix Rating
Follow these steps to select the 'Matrix Rating' Question Type in your survey:
Click Matrix Rating
To select Matrix Question type, select 'Matrix Rating' from the dropdown list.
Enter Question Text
Now enter your Question in the filed as shown. You can also preview the same under 'Add Question Preview'.
Choice for Mandatory Question
If you want to make the question mandatory or required, you can Toggle on the icon as shown in the picture below. Toggle off if you don't want to make the question mandatory to fill.
Row Label
Add row labels in the field shown in the picture. You can preview the same in the 'Add Question Preview'. You can add as many rows as you want by clicking '+ Add a row' button.
Matrix Rating Scale
Adjust the Matrix Rating Scale to your preference by selecting the scale value from the list using the dropdown icon as shown.
Select Shape
You can select any shape from the list by clicking the dropdown icon as shown.
Labels
Give labels to your matrix rating scales by adding the values in the fields as shown. You can preview the same in the right hand side panel under 'Add Question Preview'.
Click 'Submit' once you are done with all the changes.
Thank You Page
Add Thank You Page to your survey following these easy steps:
Click ThankYou Page
If you want to add Thank You Page to your survey, you can add by clicking on the dropdown icon and then clicking on 'Thank You Page'.
Enter Thank You Text
You can enter the Thank You Text in the field shown. You can preview the same in the right hand panel 'Thank You Page Review' as shown in the picture.
Enter Thank You Image
You can enter the Thank You Image through the field shown. You can preview the same in the right hand panel 'Thank You Page Review' as shown in the picture. Click 'Submit' once you done.
Add Redirection after the survey
Once the respondent reaches the thank you page, you can choose where to redirect them next. Add the Redirect URL to which you want the respondent to be redirected, and then click on Submit.
Continue the survey in a loop
Ensure the survey restarts after each response by setting the redirection URL to the survey URL and click on Submit.
Final Look
This is how your welcome page will look to the respondents while filling the survey.
Payment (PRO)
If you want your question to be of Payment (PRO) type, then follow these steps:
Click Payment (PRO)
To use Payment (PRO) Question type, select 'Payment (PRO)' from the dropdown list. This is only available in Pro Accounts.
Enter Question Text
Now enter your Question in the filed as shown. You can also preview the same under 'Add Question Preview'.
Choice For Mandatory Question
If you want to make the question mandatory or required, you can Toggle on the icon as shown in the picture below. Toggle off if you don't want to make the question mandatory to fill.
Connect to Stripe
Connect the survey with payment portal by stripe by filling all the required details.
Click 'Submit'
Click on 'Submit', once you have updated all the things.
Wrapping Up
That's all about the various question types. You can thoroughly understand each and implement them in your survey to enhance its effectiveness and impact.
Related Articles
Report customisation
You have the option to customize the graph report to align with your branding. This includes changing graph types, showing or hiding graphs, adjusting graph colors, displaying or hiding tables, customizing table headers, fonts, and more. Let's delve ...Add New Question to the Survey
In this article, we'll learn how to add a new question to your survey step by step. We'll guide you through crafting and integrating questions to gather richer, more meaningful responses. Click 'Add Question' As the first step click on '+Add ...Delete a question from a survey
Survey creation requires a lot of thought inputs and changes accordingly. There might be times one wants to delete a particular question from their survey. Steps to delete a question from a survey: On admin panel, click on Survey >> Action >> Edit. ...Skip logic
Making your survey stand out from the rest is not enough. To ensure that you get plenty of responses to your surveys require being mindful of things like cutting out the questions irrelevant to the respondent. Here, at Fynzo Survey, we use 'Skip ...Edit a survey
Creating a survey seems to be an easy task but one should be very particular about it as the data collected through them can really help your business to grow. One should always make revisions and edit their surveys before making them live. Steps to ...